food banner

food banner

Wednesday 24 December 2014

Mincemeat and Marzipan Festive Crown

Ah Christmas, how we love you - and how fat you make us. But in this case it was worth it! This recipe combines sweet zesty fruit with crisp pastry and crunchy nuts, far superior to stodgy stolen in my opinion!

This is my take on tv baker Paul Hollywood's Christmas Couronne, or crown (here for the recipe). It's a yeasted dough, rolled out flat and layered with orange marzipan and my home-made mincemeat, rolled up and then twisted into shape. Once baked I topped it with almonds, cherries and water icing with a hint of orange flower water. Delicious.

After icing

Five minutes later...


Thursday 18 December 2014

White Chocolate Mince Pie Croquembouche

I wanted to make an attractive and tasty centrepiece for my party so I set myself a change: the dreaded Croqembouche, a tower of profiteroles filled with a mincemeat cream, held together with crunchy caramel and drizzled with white chocolate.

It consists of several scary things I've never done before: choux pastry, caramel, creme patisserie, and using a piping bag! I've always been a bit terrified of all four but gave it a go!


Choux pastry

I remember once watching tv cook Lorraine Pascal, who I otherwise love, talking about how choux was allegely "the easiest pastry"! Having done it now I suppose that's true: you don't have all that cutting and roll, but you do need a strong arm for mixing and constructing anything from it is very fiddly.
Choux involves boiling up milk, adding flour, then slowly stirring in eggs to a smooth paste. It's slightly hard work but quite easy. I recommend fellow amateur baker and Great British Bakeoff alumnus Ruth Clemens' choux recipe, it's easy to follow and gave exactly the quantity I wanted, which was about 70 smallish profiteroles. I made them a couple of days before.

Creme patisserie

"Creme pat" is basically egg custard with some added flour, There are so many creme patisserie recipes around it was hard to know which to use! I made mine slightly thicker than usual, then mixed with some leftover mincemeat which I'd blitzed to a paste.

Piping... I've never piped before and that was probably the worst part. Getting a creamy mixture into profiteroles without them bursting or being underfilled was a real pain. I guess it just takes practice!

Caramel

Caramel always scared me because I've seen horror stories of people burning it, burning themselves, and making a terrible mess of their surfaces! I followed some good advice from a trusty old book: use a sugar thermometer to raise the temperature to 154C rather than doing it by eye, and wear rubber gloves so you don't burn yourself!

Assembly

The caramel is used to weld the profiteroles together into a pile - the trick is using enough caramel so they stick together, but not too much so they're impossible for your guests to pick apart! As a rookie I used too much, particularly the ones at the bottom (when I was just starting), so they had to be chipped apart with a knife!

A great trick I saw on Youtube was making spun sugar using two forks. I have to say spun sugar really does look beautiful with its golden hairlike strands. Dip two forks into the caramel, stick them together by the profiterole pile then pull them apart, forming fine hairs you wrap around as decoration. I'll definitely use that trick again.

Finally I briefly zapped some white chocolate in the microwave, left it to melt, then drizzled it over the pile. Piping would've been prettier but after 70 profiteroles I was sick of piping by that point!

Wednesday 17 December 2014

Festive party snacks

It's well into the party season and Merry Christmas to you all! I had my festive party at the weekend so thought I'd share a few snack ideas which are easy to make and should satisfy your guests! The centrepiece is a Croquembouche or profiterole pile - that's more tricky so I'll cover it in another episode!
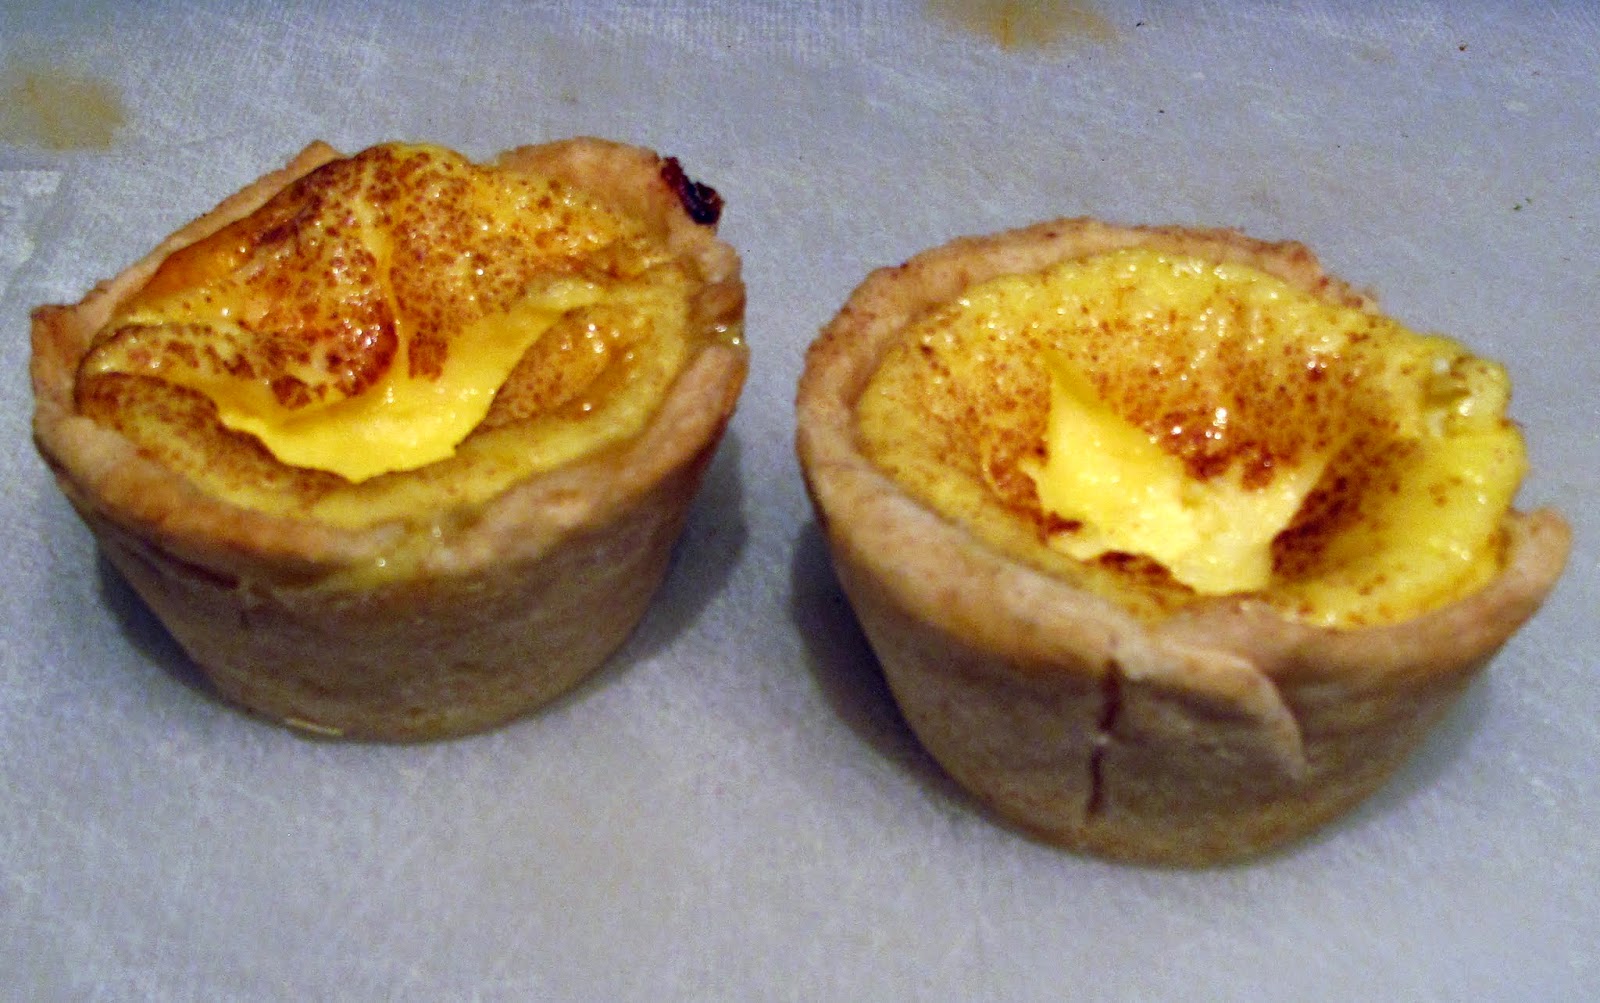

Mince Pies

So many people say they don't like mince pies because they've only ever eaten those Mr Kipling-types with thick claggy pastry and mincemeat that tastes of nothing! A really good mince pie should have crisp pastry and a really rich flavoursome filling, oozing festive cheer.

I've already covered my mincemeat recipe, which is rich and zesty with citrus. And rum. I won't reinvent the wheel by giving you a pastry recipe, Paul Hollywood's sweet shortcrust pastry recipe is what I used and it's great. Some people like big deep-filled mince pies, but for parties I prefer smaller, bite-sized ones you can just pop into your mouth. I use tart tins, a dozen to a tray. With nice thin crispy pastry, Paul Hollywoods recipe makes several dozen.


Crostini


I covered crostini in my Summer party recipes. You can make these bits of crunchy toasted bread several days before, then top with anything you fancy: cream cheese, Stilton, roasted cherry tomatoes, roast vegetables: go wild. I topped mine with mushroom paté, with a grating of nutmeg just to keep it festive.
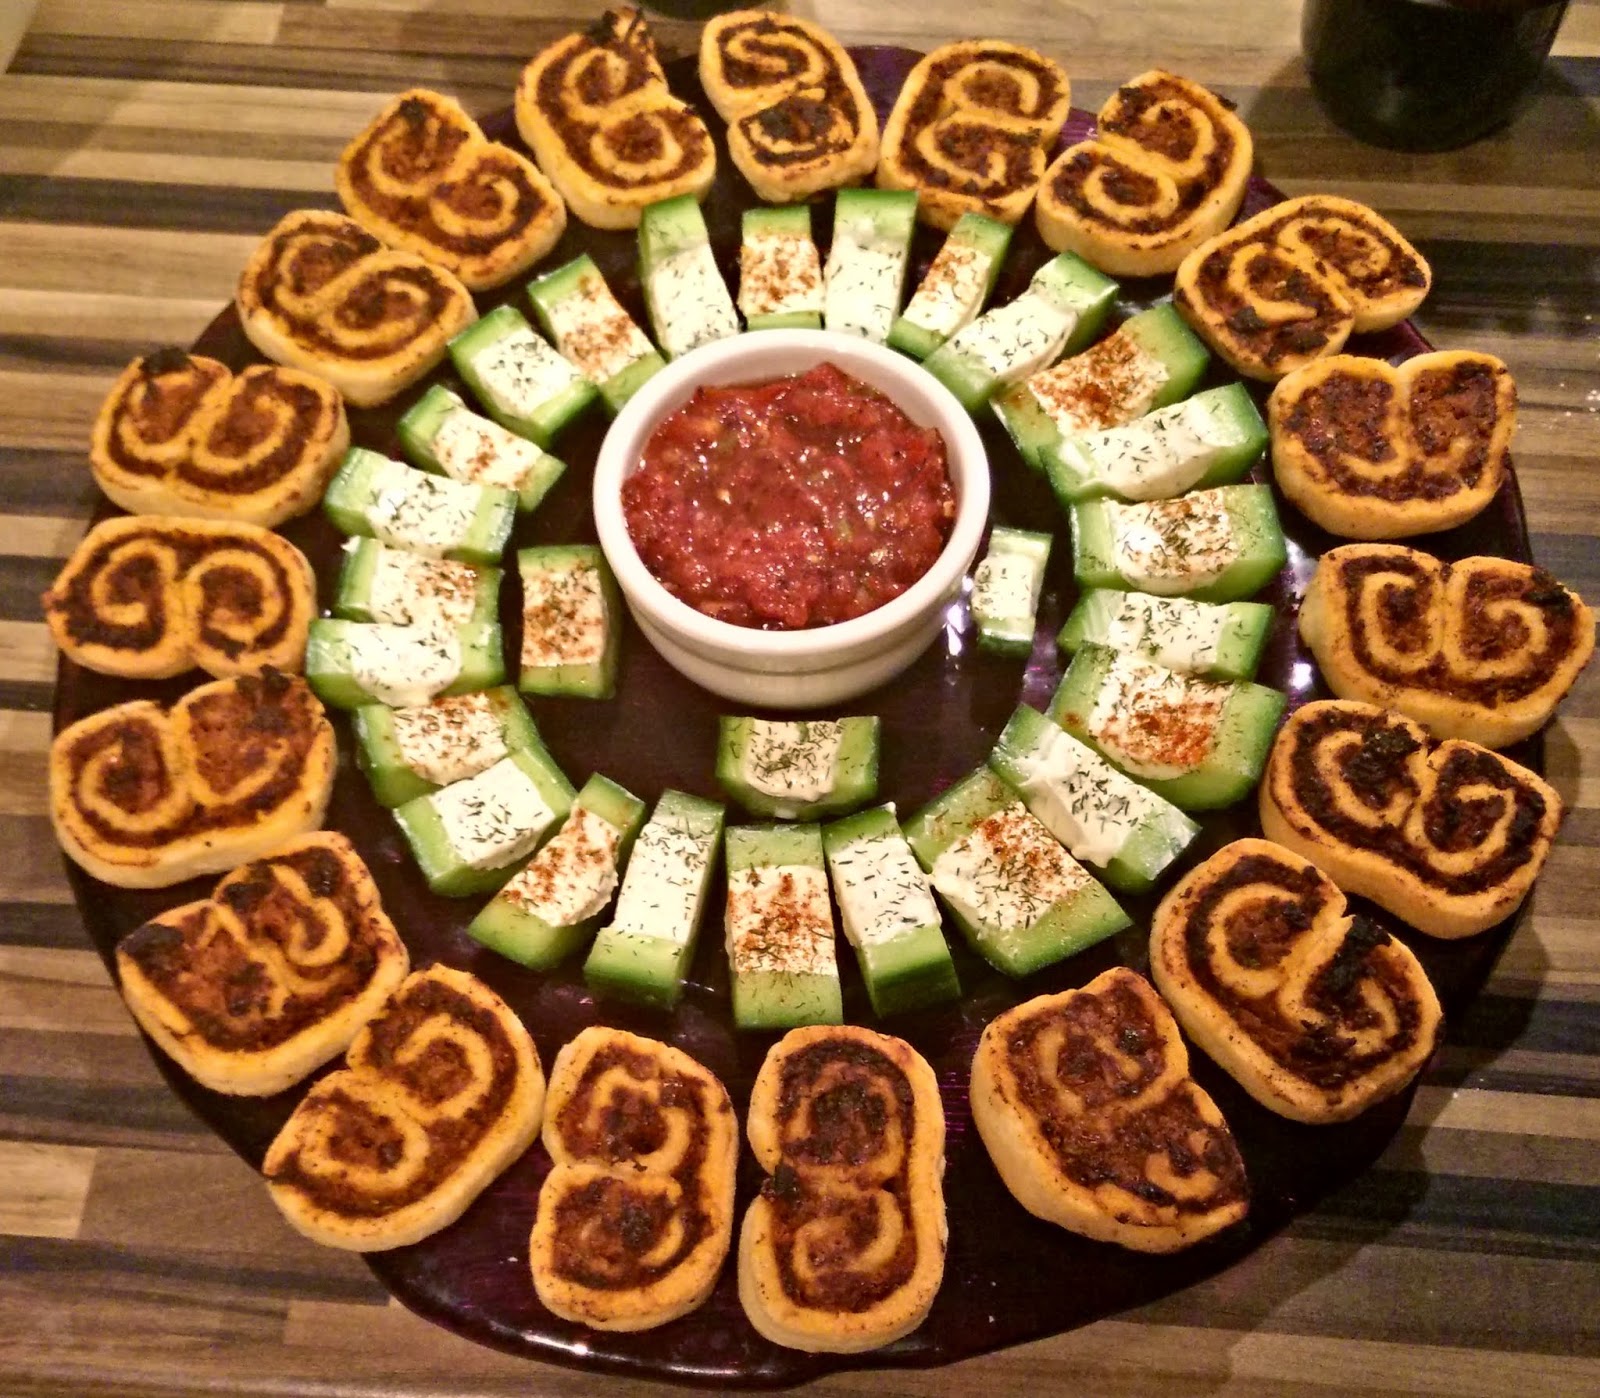
Palmiers

Palmiers look so pretty on a plate and people assume they're complicated with their pretty swirls, but actually they're really quick to make! If you're pushed for time buy sheets
of pre-rolled shortcrust or puff pastry.

This time I lightly blitzed a mixture of sundried tomatoes, olives, rosemary and goats cheese into a thick chunky paste, and spread it evenly over a rectangle of pastry. Take one side of the longest side and roll it up tightly, like a Swiss roll, until it reaches the middle. Turn and do the same the other side, so you have two rolls next to each other. Pop in the fridge for half an hour to firm up, cut into slices, pop them onto a backing tray and cook in a hot 200C hot oven for about twenty minutes until golden.

Dips

Dips are an essential part of any buffet, great with corn chips, crisps and sticks of carrot, celery and cucumber. Plain yoghurt is an exellent base for dips: I often mix it with fresh herbs, especially mint or dill, garlic, maybe lemon juice and a sprinkling of salt.

Tomato salsa is always a crowd pleaser but the stuff you buy often seems a bit funny to me and goes off quickly. I use half a tin of tomatoes, a handle of cherry tomatoes, a couple of spring onions, a few small fresh or dried chillis, a little bit of garlic, salt, possibly a splash of wine vinegar, and chop them all up together. Make it as chunky or smooth as you like.

Cucumber bites

These are really the easiest thing in the world. Top and tail a cucumber, slice it in half and use a teaspoon to scoop out the centre of each half. Fill the scooped core them with a topping: cream cheese, hummus, paté, anything you fancy, then chop into finger-width slices. Arrange on a plate and dust with black pepper, cayenne or herbs for that final touch. Simple!

Monday 8 December 2014

Homemade mincemeat

I'm making mincemeat - I know, I left it really late! Fortunately my method of warming through the fruit helps it along. Best made a month or so in advance, but even if not, it's still way better than the sickly sweet stuff you buy in jars.

The smell of citrus, dried fruit and spices really gets me in the festive mood. I like mine citrusy and not too sweet. Candying your own peel seems a pain but it's really pretty quick. Lemons are great but grapefruit adds a sharpness and a floral note. I use butter instead of suet - you can get vegetable suet but it's just palm oil, butter tastes much better. I like using rum instead of the traditional brandy, in practice it doesn't make much difference.


  • 150g currants
  • 150g sultanas
  • 150g raisins
  • 2 oranges
  • 1 grapefruit
  • 1 cooking apple, peeled and grated
  • 190g soft brown sugar
  • 1 nutmeg
  • 1 tsp mixed spice
  • 100g butter, chopped
  • 100ml spiced rum (or brandy)
  1. Peel the citrus fruit and chop the peel.
  2. Squeeze the remaining flesh to make juice.
  3. In a small saucepan heat 100g (roughly half) of the sugar with the juice of a grapefruit.
  4. Put the chopped peel in the hot syrup - add a splash of water if it doesn't quite cover the peel. 
  5. Simmer for 15-20 minutes until the peel is translucent and tender.
  6. In a larger pan, add all the remaining ingredients, excluding the alcohol. Pour over the candied peel mixture and stir.
  7. Warm on a gentle heat for about ten minutes so the butter and sugar melt. There's no need for it to boil, just a gentle heat so the fruit plumps up.
  8. Leave to cool, then stir in the alcohol.
  9. Put in a small covered bowl or container and leave for 2 days before bottling in sterilised jars.

Mincemeat is great in mince pies but you can also use it in flapjacks, baked apples, pastries, any other number of recipes. Before using it, loosening up the mixture with some fresh lemon juice gives it an extra fresh kick.

Variations

Many people add chopped almonds or cranberries to mincemeat - try it if you like but I consider these nasty surprises when encountered in a mince pie!

I prefer using spiced rum but the traditional brandy is fine, or sherry. For an alcohol-free alternative, add the juice of an orange at the end.

Tuesday 25 November 2014

Roast mushroom risotto

I've covered risotto tips before but thought I'd post my mushroom risotto. It was delicious and totally hit the spot to warm up on a wintery late autumnal night!

I also have a new camera phone, I think it takes better pictures...


Mushroom risotto is pretty much bog standard vegetarian fair, I improve the flavour by slow roasting the mushrooms first to give them more of a kick. Wild mushrooms are in season so use them if you're lucky enough to get your hands on them!


  • 400g rice serves four
  • 1 litre rich vegetable stock
  • Large knob of butter or olive oil
  • 1 onion, finely diced
  • Lots of mushrooms (I don't know, a punnet?)
  • 2 cloves garlic
  • Glug of white wine or white Vermouth
  1. Heat the oven to 170C and roast the mushrooms whole for about 20 minutes
  2. Meanwhile dice the onion, take a large pan and fry the onions on a moderate heat with a splash of oil and knob of butter, until pale
  3. Add the rice and mix thoroughly so the grains are coated and they start to go very slightly nutty
  4. Splash in the wine and stir until the alcohol evaporates.
  5. Add about 500ml of the stock, stir thoroughly and wait for it to absorb, stirring occasionally.
  6. By now the mushrooms are done, removed from the oven and roughly chop, saving a few pieces to garnish.
  7. Once the rice has absorbed the first lot of liquid, add a glug more, enough to cover the rice, and stir in the mushrooms and garlic.
  8. Keep adding more stock and stirring until you've used all the liquid. The grains should be tender and just barely al dente. Add plain water if it needs.
  9. The finished consistency should be gooey like rice pudding, it should slide off a spoon but not be runny.
  10. When done, take off the heat, add another knob of butter for a final flourish.
  11. Serve on hot plates with either chopped parsley or sage, a few mushroom slices, and a grate of Parmesan or Pecorino.

Saturday 18 October 2014

Chocolate chilli

Dark cocoa and fiery chillies are a classic Mesoamerican combination, they were eaten (and drunk!) together for centuries before Europeans turned cocoa into a sweet creamy confection.

I've seen lots of chocolate chilli recipes but they're often too sweet and greasy - I use bitter cocoa powder, hot dried chillies and black turtle beans to make a rich dark chilli.


  • 500g black turtle beans
  • 2 medium onions, chopped
  • 2 carrots, finely chopped
  • 1 can chopped tomatoes
  • 4 heaped tsps cocoa powder
  • 3 garlic cloves, crushed
  • 4 chopped dried birdseye chillies (or 3 tsp chilli powder)
  • 2 tsp cumin seeds
  • 5 squares of milk chocolate
  • 2 tsp Swiss Marigold stock powder
  1. Soak the beans for 8 hours or overnight - change the water a couple of times as this prevents bean-bloat.
  2. Drain and rinse, then boil them for about 30-40 minutes until tender.
  3. In the meantime, splash some oil into another pan and gently fry the onion and carrot until translucent, about five minutes.
  4. Stir in the cumin seeds and fry for another minute.
  5. Add the tomatoes, stock powder, garlic and chilli and cook on a moderate heat for about ten minutes.
  6. Drain the beans when they're cooked but reserve the rich black cooking liquid.
  7. Put the cocoa in a cup and mix with a bit of the cooking liquid so it forms a paste. This is just to stop the cocoa forming lumps.
  8. In a large saucepan, combine the beans, cocoa and tomato mixture. Add enough of the bean cooking liquid to cover the beans.
  9. Gently simmer for about thirty minutes, stirring occasionally. Add more of the cooking liquid if it gets too dry.
  10. Five minutes before serving, stir in the chocolate chunks.

Serve with rice or corn chips. My serving suggestion is to put a dollop of yoghurt or sour cream on top, with a sprinkling of paprika, a scattering of chopped parsley or coriander, and just a little finely grated chocolate.

Variations

Black beans are perfect for this recipe but if you can't find them, classic kidney beans are fine. Use tinned ones to save time.

This makes a moderately spicy chilli, feel free to add a lot more.

I often bulk this out with dried soya mince, which adds protein.

Thursday 9 October 2014

Chargrilled aubergines with goats cheese and parsley pesto

This is my version of chef Simon Hopkinson's "favourite aubergine recipe" and I can see why. Its mixture of hot smoky aubergine, silky pesto and the contrast of cool cheese, is simply delicious. He says it would make a lunch or supper but for a hearty appetite like mine it's just a starter!

He recommends feta but I rather like the richness of a nicely goaty goat's cheese, and the warm nuttiness of walnuts add some much needed bite. Serve with pitta bread to mop up the oil and juices!


Per person:
  • 1 long oval aubergine
  • 1 clove garlic, crushed
  • 1 tbsp balsamic vinegar
  • Bunch of fresh parsley, chopped
  • Handful of walnuts
  • Good olive oil
  • Pinch of sea salt
  • Goats cheese, cut into chunks
  1. Pierce the skin of the aubergine around the neck of the aubergine, just under the leaves. Run the knife down the length of the aubergine the up the other side to the top. Give the aubergine a quarter turn, then do the same. These cuts allow you to peel off the skin more easily once it's done.
  2. Crank up your grill to a high heat, and place the aubergine under the grill for five minutes or so until the skin is blackened. Turn and repeat four times unless the whole aubergine is chargrilled. Let it go as black as you dare and your smoke alarm will allow!
  3. While the grill is on, briefly brown the walnuts for a few minutes making sure they don't burn, then chop.
  4. Mix the walnuts with the parsley, garlic, vinegar and enough good olive oil to cover. Mix together, either just mixing or crush together in a pestle and mortar.
  5. When the aubergine is nicely blackened, remove from the grill and peel off the skin. If it's really juicy leave it to cool and drain for a few minutes.
  6. Transfer to a plate with one cut side up.
  7. With a knife slice down, and spread open the aubergine like a fan.
  8. Spoon the pesto mixture onto the aubergine, then sprinkle lightly with sea salt.
  9. Dot with cool goats cheese, and enjoy!

Variations

Simon Hopkinson's original recipe uses feta and lemon juice.

Saturday 4 October 2014

Summer Party Crostini

Oops here's one I forgot to post: my summer party snacks!

Crostini - slices of crispy toasted bread - are the simplest party snacks, but can look fantastic with tasty toppings. You can buy mini crostini for not very much, but they're so simple to make fresh yourself.

Crostini

It's actually better using bread bought the day before, so crostini are a great way to use up baguettes that are past their best. Made in advance, they'll keep for a few days.
  • 1 French stick/baguette 
  • Olive oil
  • Sea salt for sprinkling
  1. Preheat your oven to about 190C.
  2. Take your French stick and cut into thin, equal slices.
  3. Brush each side of each slice with oil and place on a baking tray.
  4. Put into a hot oven for about 8 minutes until they're slightly browned and crunchy. 
  5. Cool, sprinkle with salt and put them in an airtight box.

Mediterranean Feta & Vegetable topping

  • Red peppers
  • Courgettes
  • Pesto
  • Feta cheese
  1. Take whole red peppers and put under a hot grill til the skins blacken, then turn until the whole skin is charred. Place in a plastic bag and seal.
  2. Slice some courgettes, toss in a couple of tablespoons of olive oil then grill til lightly browned on both sides.
  3. Take the peppers from the back when slightly cooled, peel off the skin and remove the stalk and seeds.
  4. Cute the peppers lengthways into strips about 1cm wide.
  5. Chop the feta cheese into small sticks about 2cm long
  6. To assemble, spread pesto on the bread, add a slice of courgette, a strip of pepper, and top with feta.

Blue Cheese, Mint & Nectarine topping

The sweetness of the nectarines is a great match for the salty richness of cheese. Use a Stilton or any rich creamy blue cheese.

  • Nectarines
  • Blue cheese
  • Fresh mint
  1. Cut each nectarine in half, remove the stone, an cut into thin wedges (about 12 slices per fruit depending on size).
  2. Chop the mint and toss the mint and fruit in a bowl.
  3. Spread each crostini with blue cheese, then top with a slice of nectarine


Monday 1 September 2014

Bulgaria cheese & spinach filo pie

I love Mediterranean food, particularly Eastern Mediterranean like Greek, Turkish and Lebanese which all share a similar cuisine. A Greek boss of mine used to make me spanakopita - spinach and feta pie - as a reward for good work, which was always a great way to make me happy!

This is my take on the Bulgarian version, banitza, which is made with Bulgarian sheep's cheese. To keep it interesting I also added sundried tomatoes, one of my favourite things! Bulgarian sheep's cheese has a distinctive pungent flavour, but use feta or even ricotta if you like.


To make it you'll ideally need an 8" loose-bottomed cake tin, one of the low-sided ones used for making a Victoria sponge.

Serves 4

  • 250g frozen spinach, defrosted (or equivalent wilted fresh)
  • 150g cheese, crumbled
  • Filo pastry, approx 3 sheets
  • 2 eggs, beaten
  • 80g sundried tomatoes in oil, chopped
  • Handful pine nuts or sunflower seeds
  1. Preheat the oven to 180C.
  2. Squeeze the spinach to wring as much moisture out of it as possible, then chop.
  3. Mix with the crumbled cheese and tomatoes.
  4. Pour in the egg, saving a tablespoon or so for brushing on the top.
  5. Brush your tin with oil, then brush the first sheet of pastry with oil from the sundried tomatoes.
  6. Layer the filo so that it covers the bottom while leaving enough to fold over the top. Repeat with the second two sheets, brushing them with tomato oil. Make sure the pastry is gently pressed into the edges of the tin.
  7. Spoon the filling into the pastry and smooth it out.
  8. Fold the remaining filo over the top. If any of it cracks or crumbles that's no problem, it will just make the top look more interesting.
  9. Brush with the remaining egg and sprinkle with nuts or seeds.
  10. Bake for 30 minutes until the top is golden brown.
  11. Leave it to cool, it's best eaten merely warm or even cold.

Variations

I used sunflower seeds here as I had some, they're a lot cheaper and I like their flavour. Use pine nuts or just leave them out.

You can make this in any size; double or triple the proportions for a large dish. When cool, cut it into portions as a party snack.

Banitzi are little individually wrapped cheese pies, which make great starters, snacks or as meze. Take a strip of filo a finger-length wide, a spoonful of filling, and roll up into a tube. Bake them for 15-20 minutes until golden.

Omit the tomatoes for a more "authentic" version.

Sunday 31 August 2014

Spaghetti carbonara

This is a great brunch recipe, since it kinda feels like breakfast, but looks like lunch! Its hit of carbs, salt and protein is also great for a hangover.

I used Quorn pepperoni slices just because I had some, but you can use any brand of fakon, or leave it out entirely. Carnivores can use a good organic pancetta instead.


Serves 2
  • 4 eggs
  • 200g wholewheat spaghetti
  • 6 slices Quorn pepperoni, chopped
  • 2 medium spring onions, finely chopped
  • 2 tbsp grated Parmesan
  1. Put the spaghetti on to boil with a generous seasoning of salt.
  2. In a large heavy bottomed frying pan, heat a tablespoon of oil and a knob of butter on a moderate heat.
  3. Gently fry the onion and pepperoni for a few minutes. Take off the heat.
  4. Crack the eggs into a bowl, mix with a fork, then pour into the frying pan. The residual heat will warm and very slightly set the eggs but they should still be runny.
  5. Stir 1 tbsp of Parmesan into the eggs.
  6. When the spaghetti is cooked, drain it, saving some of the hot cooking water.
  7. Immediately plonk the hot spaghetti into the frying pan and mix with the egg. The hot spaghetti should become coated with the egg mixture.
  8. If it's a little sticky, add a few tablespoons of the starchy cooking water. The egg should be set but still gooey, and the spaghetti should be slippery, not stuck together.
  9. Serve immediately, garnishing with the remaining Parmesan and some chopped parsley.

Variations

White spaghetti works fine, I just enjoy the nuttiness of wholewheat which works well with this delicate egg sauce.

Rather than using bacon, try chopped sun-dried tomato, it looks similar when mixed up and adds saltiness.

If you like it more cheesy, add more. A sprinkling of crumbled feta into the eggy mixture also works well.

Saturday 30 August 2014

Green Tea Pea Soup

In my hurry to serve I totally forgot to take my own pic (that's not mine!), but you can imagine: it's delicious green goodness in a bowl!

Pea soup is the easiest last minute soup in the world, but it can be delicious and elegant too.  The smokiness of a good green tea adds a certain something to this soup. I particularly make this when I have any leftover potatoes and cold tea, waste not want not!

Serves 4.

  • 2 large spring onions
  • 1 medium sized boiled potato, chopped
  • 500g frozen peas
  • Bunch of parsley
  • Bunch of mint
  • 500 ml green tea (a potful)
  • 3 tsp good vegetable stock powder
  1. Chop the spring onions and herbs. Reserve a little bit of each for garnishing at the end
  2. Heat a splash of oil and a knob of butter in a large saucepan, then gently fry the onions and potato for a few minutes until soft but not browned.
  3. Mix the stock with the green tea.
  4. Add the frozen peas to the pan and stir til they heat through, then pour in the tea stock. Add more water if it doesn't quite cover the peas.
  5. Raise the heat and cook til it's hot and the peas are cooked, only a few minutes.
  6. Add the herbs and whizz with a hand blender until everything is smooth and silky
  7. Depending on how thick you like your pea soup, add water or milk to bring it to your preferred consistency. I find thick soups are good for a cold day, thinner for more clement weather.
  8. Ladel into bowls, garnish with a blob of Greek yoghurt and a sprinkling of chopped onion and herbs.


Tuesday 26 August 2014

Oaty Apple Crunchable

With this wet autumnal weather I'm craving hot wintery dishes! I call this a crunchable: it hits the spot just like a crumble, but has healthy oats and only takes five minutes!

The toasted oats and caramelised sugar give a nice crunch. It works as a topping for any kind of stewed fruit, or use tinned fruit for an instant treat. Last week I collected a load of mixed windfall apples which I stewed gently for about ten minutes with sugar, cinnamon and a knob of butter.

Serve with hot custard, or cold ice cream! I ate mine with toffee frozen yoghurt - stay tuned for my recipe!


This recipe makes enough for one lucky person:
  • 2 handfuls of oats (no measuring here!)
  • 1 handful brown sugar
  • Knob of butter
  1. Take a frying pan and melt the butter on a moderate high heat
  2. Toss the oats and sugar in the hot butter.
  3. Stir until the oats go nutty and the sugar starts to melt and caramelise. This only takes a few minutes, don't let it burn!
  4. Tip the hot mixture on top of a hot bowl of stewed fruit. Enjoy!

Monday 25 August 2014

Baked eggs and tomato

This is a lovely recipe for a leisurely Sunday brunch, particularly on a wet miserable day like today! This recipe makes two eggs per person in individual serving dishes. Eat it with crusty bread or sautéed potatoes.


  • 2 eggs
  • 2 large tomatoes, quartered
  • 1 clove of garlic, roughly chopped
  • Tomato oil (from sun-dried tomatoes), or olive oil
  • Half tsp paprika
  • Cheddar or parmesan for the top (optional)
  1. Preheat oven to 180C
  2. Put a tablespoon of oil in a small ovenproof dish
  3. Fit the tomatoes and garlic into the dish. 
  4. Sprinkle with salt and dust with paprika.
  5. Cook in the oven for about 30 minutes
  6. Remove from the oven, make twos hollows in the tomatoes and gently crack an egg into each.
  7. Return to the oven and cook for about eight minutes, until the whites are set but the yolk still runny.
  8. If using, add a sprinkling of grated cheese around the edges just before the end of cooking.

Variations

If you have stale leftover bread that needs using up, shred a slice into the bottom of the dish before layering with tomatoes. The bread soaks up the oil and tomato juice making a delicious gooey mixture.

I like the warm heat of paprika, but herbs like thyme or chives are a nice alternative. Chilli gives a spicy kick.

Tuesday 19 August 2014

Peach and ginger cobbler

My best recipes always seem to be "I have loads of this and loads of that, what can I do with them?"

This time I had a punnet of peaches which had been rock hard for a week, then all went soft at once. Plus a load of ginger which has been languishing in my fridge a while, and I thought, do peaches and ginger go together? It turns out that yes, they're a delicious combination!

I considered a crumble or a pie suddenly thought, of course, peach cobbler! I haven't made a cobbler in years, but this was a delicious success. The crunchy top and gooey insides with the soft spicy peaches are heavenly.


For the cobbler:


  • 100g self raising flour
  • 50g butter
  • 50g sugar
  • 2 tbsp cold water

  1. Put the flour, butter and sugar into a bowl and rub all together.
  2. Add the water a little at a time until it all comes together into a dough.
  3. Wrap the dough and put in the fridge to cool.

For the peaches:


  • 4 ripe peaches, stoned and cut into segments
  • 1 thumb of ginger, peeled and grated
  • 1 small orange
  • 20 g sugar
  • Generous knob of butter
  • 1 tsp vanilla extract
  • Small glass sherry or amaretto

  1. Take the zest from the orange, cut off the remaining peel then slice the flesh into chunks.
  2. Put the butter into a pan on a high heat.
  3. Add the peaches and mix, you want them to caramelize a little bit.
  4. Stir in the ginger and orange.
  5. Add the sugar and mix in, then add the sherry and vanilla.
  6. Mix together until the sugar has all dissolved then take off the heat.

Assemble and cook:


  1. Preheat your oven to 180C or equivalent.
  2. Gently spoon the peaches into either two individual oven dishes or one larger dish.
  3. Take the cobbler dough from the fridge. Roughly roll out to an inch thick, and with a small cutter, cut 4 or 6 discs depending on thickness and size of your cutter.
  4. Pop the discs of dough on top of the peaches.
  5. Place in the oven and cook for about 20 minutes.
  6. Serve with cream or ice cream!


Variations

Flaked almonds are a nice addition to the cobbler, it gives extra crunch.

I like the nice round effect that you get from using tiny biscuit cutters, but to save time and effort, simply cut the dough into six portions, roll into balls with your hands then flatten them slightly.

Monday 18 August 2014

Caramelised fennel and blue cheese risotto

It's turned a bit autumnal here despite being August, so after buying some big fat fennel bulbs in the market I made a favourite warming recipe, fennel risotto with blue cheese.


It's amazing how satisfying a good risotto can be, it's such warming comfort food. It's simple to make but there's definitely a knack to it - the rice should be soft but not overcooked, and there should be enough liquid to ooze a little on the plate, but not so much that liquid runs out. Restaurants often serve runny risotto, this is very wrong to me!

My recipe serves 2-3, you can serve a small portion as a starter. Use whatever blue cheese you favour, a good Stilton or strong Gorgonzola gives a robust flavour and creamy texture, but use something milder if you prefer. A good rich stock is vital to a good recipe, I use Swiss Marigold vegetable stock.


  • 1 large fennel bulb, finely sliced
  • 1 onion, finely sliced
  • 200g risotto rice
  • 50g blue cheese
  • 500 ml rich vegetable stock
  • Small glass of white wine or white vermouth
  • Knob of butter
  1. When slicing the fennel, reserve the whiskery fennel tops for decoration at the end.
  2. Splash some oil and a knob of butter in a large frying pan and fry the fennel and onion, initially on a high heat. 
  3. When the onions start to go translucent, turn down to a gentle heat and cook for about ten minutes until the fennel and onion go soft and caramelised. 
  4. When done, remove from the heat and put to one side.
  5. To cook the rice, add oil and a knob of butter in a high-sided frying pan or sauté pan.
  6. When the butter starts to bubble, add the rice and stir until all the rice is coated in the oil. Stir for a couple of minutes, this gives the rice a slightly nutty aroma.
  7. Stir in the wine or vermouth until the alcohol evaporates, then pour in enough stock to cover the rice.
  8. Stir stir stir! Each time the liquid has nearly been absorbed, add more.
  9. Once you've used the stock and the rice is part cooked (5-8 minutes or so), stir in the fennel and onion mixture.
  10. Keep stirring until the rice is cooked, adding more water as necessary.
  11. Taste the rice occasionally to check when it's done.
  12. When done, take off the heat and mix in the cheese.
  13. To serve, spoon into the middle of a plate and sprinkle with fennel fronds and shavings of blue cheese.

Variations

Caramelised fennel has only a mild aniseed flavour but if you want more kick, add a teaspoon of fennel seeds.

A sprinkling of toasted walnuts when serving gives an extra nutty warmth to the dish.

Thursday 31 July 2014

Corn and red pepper chowder

I was feeling a bit under the weather, had some bright red peppers that needed using, and a bag of corn in the freezer... that means corn chowder! It totally cheered me up, it's hearty, summery soup which looks so pretty in the sunshine.


  • 1 large onion, roughly diced
  • 2 red peppers, chopped
  • 1 carrot, diced
  • 200g small waxy potatoes, chopped into bite sized chunks
  • One 400g can or equivalent frozen sweetcorn
  • 500 ml vegetable stock (ideally with Swiss Marigold)
  • Sprigs of fresh parsley (optional)
  • Natural yoghurt or sour cream (optional)

  1. Reserve roughly a quarter of the sweetcorn.
  2. Splash some oil into a large saucepan along with a knob of butter, and heat.
  3. Fry off the chopped onions, then add the peppers and carrot for a few minutes until softened.
  4. Make up your stock with boiling water and taste it to make sure it's tasty. The secret to any soup is a good stock.
  5. Liquidise the remaining sweetcorn with a little bit of the stock, then add that and the rest of the stock to the pan. If it doesn't quite cover the vegetables add a splash more water.
  6. Put on the lid and cook on a moderate heat until the potatoes are cooked (10-15 mins).
  7. When it's ready, ladle chowder into bowls and garnish with a spoonful of natural yoghurt or cream, and a sprinkling of fresh parsley. Enjoy!


Variations

A handful of Quorn chunks adds protein to this dish.

Meat-eaters can use a good chicken stock and add flaked white fish.

Friday 18 July 2014

Cool down with Spicy Beetroot Gazpacho

It's el scorchio in London, the hottest day of the year so far! Hankering for something cooling I made gazpacho with a slight difference - the earthy sweetness of beetroot, cooling cucumber, and the spicy kick of chili and garlic. Delicious!

  • 1 tin of tomato passata/chopped tomatoes
  • 2 cooked beetroot (pref not in vinegar)
  • 1/4 stick of cucumber, roughly chopped
  • 1 stick celery
  • Pinch of salt
  • 1 garlic clove
  • 1 tbsp red wine vinegar or lemon juice
  • 1 tsp tabasco (to taste)
  1. Whiz up all the ingredients in a blender
  2. Serve chilled with lots of ice.

Variations

Fresh tomatoes are actually best, but you need juicy red ones that you'll have to skin by immersing in hot water.

Roasted beetroot give the best flavour here as it really brings out their sweetness and reduces the earthiness.

Also wonderful with a slug of gin!

Tuesday 1 July 2014

Roast butternut squash & tomato with bulgar wheat salad

Whilst cooking my lovely tagine the other day, I roasted some extra chunks of butternut squash, tossed with chilli powder and cinnamon, because it's great to have cold as a salad.

I also roasted some plum tomatoes, tossed the two together in sweet balsamic vinegar, and served with cold bulgar wheat which I'd cooked with a pinch of cumin. Dished up, I finished off with a generous squeeze of lemon juice and some chopped spring onions. Healthy, tasty and cool with a slight kick.

Also a nice picture I think! I'm trying to practice my food photography, with hot dishes I don't always have time!


Sunday 29 June 2014

Cabbage & Tofu stir fry with Egg Fried Rice

My lunch, for your delectation. My Asian friend assures me this is very far from being an authentic Chinese dish but good all the same!


Cabbage & Tofu

Serves two, or one very greedy person (me).
  • 200g firm tofu
  • Half a Savoy cabbage, shredded
  • 2 spring onions thickly sliced
  • Little thumb of ginger, thinly sliced
  • As much sliced red chilli as you're comfy with
  • Soy sauce
  • 1 lemon wedge per person
  1. Take tofu slices and cut into triangular chunks. Pat dry with a teatowel.
  2. Heat oil in a wok (sufficient to cover about half the thickness of the tofu) and fry the tofu, about 4 minutes on each side.
  3. Drain and reserve the oil, leaving a couple of tablespoons for frying.
  4. On a high heat, add the cabbage, onion, ginger and chilli. Stir fry for a few minutes until the cabbage browns very slightly.
  5. Add soy sauce and a splash of water and stir, then add the tofu.
  6. Cook the cabbage for a few more minutes. It's done when it's al dente, slightly crunchy but cooked through.
  7. Drain the cabbage and liquid into a serving dish.
  8. As a final touch, squeeze lemon juice over the top.

Egg fried rice

This is my favourite way of using up leftover rice from the night before. It's great just for breakfast with chilli sauce on top.

There are several ways to make egg fried rice, but I like this style which leaves distinct bits of egg. Also saves you the bother of beating the egg first

  • Cooked rice
  • 1 egg per person
  • Chopped spring onion (optional)
  • 1/2 tsp sesame oil
  1. Add a tablespoon of the reserved oil to the wok and heat.
  2. Crack in an egg. Leave the white to cook for a few seconds, then scramble it all.
  3. Add the rice (and onion if using), stir and let it heat through and cook for a few minutes.
  4. Take off the heat, stir in the sesame oil and serve immediately.

Friday 27 June 2014

Chickpea and butternut squash tagine

This quick tagine was totally a random recipe, but packed with warm Moroccan spices it's so delicious I wished I'd invited people over! It'll look elegant served by candlelight on a hot summer's evening, or as a tasty lunch with couscous, rice or flatbreads.

I just wanted a way to use up a squash and leftover chickpeas from making hummus, but oh my, this is sooo good it's a new favourite.


  • 1 butternut squash, peeled, seeded and cut into slices
  • 1 large onion, roughly sliced and chopped
  • 2 sticks celery, chopped
  • 1 orange
  • 400g chickpeas (approx, cooked or canned)
  • 3 cloves garlic, chopped
  • 1 medium chilli
  • Ground coriander or coriander seeds
  • 2 tsp cinnamon (or a stick)
  • 2 tsp ground ginger
  • 2 tsp allspice
  • 2 tsp vegetable stock
  • 1 tin of chopped tomatoes
  • (Dried chilli if you want more heat)
  1. Preheat the oven to 180C.
  2. Put the squash slices into a bowl. Splash with oil and a sprinkling of salt, enough to coat. Roughly chop one clove of garlic and mix everything together.
  3. Spread the squash mixture on a baking sheet and roast for approx 20 mins until the slices start to caramelise on the outside but are still firm.
  4. Meanwhile, splash oil into a large pan and gently fry the onion and celery.
  5. When translucent, stir in the chilli, garlic and dry spices.
  6. Add the tomato and stock powder. Fill up the can with water and add to the pan.
  7. Peel a few strips of zest from your orange with a potato peeler, then juice it. Add both to the pan.
  8. Add the chickpeas and cook for 5 minutes or so.
  9. Check seasoning - add more salt if it needs, and dried chilli if it needs more oomph.
  10. By now the squash will be ready. Remove from the oven, and chop the slices into bite-sized chunks. Tip into the pan and stir. Add more water if it's too dry, you want the squash to be covered.
  11. Turn down to a gentle heat and cook until both the chickpeas and squash are tender.
  12. Serve topped with chopped fresh coriander or parsley and a squeeze of lemon juice. 

Variations

If you want more sweetness, try adding dried dates or apricots.

When serving, a drizzle of tahini on top adds a nice nutty addition. Or top with toasted flaked almonds to add crunch.

Thursday 26 June 2014

Chilli hummus

Another sparkling summer recipe today! Hummus is endlessly variable, you can really add whatever flavourings you like. Home-made is miles better than the bland beige stuff that ends up going fizzy in your fridge.

Personally I like the bold heat of garlic, chilli and cumin, but add whatever flavourings you most enjoy. Serve it as a dip with chopped veg, but even better, spread a big dollop on a plate and pile savoury things on top - a herby salad with feta, any kind of roast veg, or even (shh) meat! Ditch the cutlery and mop it all up with tasty Mediterranean flatbreads.

Personally I prefer using chickpeas I've soaked overnight and boiled for an hour or so, I think the flavour is better. It's also much cheaper than canned! But if you're pushed for time, tinned chickpeas are just fine.


  • 400g chickpeas (cooked or canned)
  • 2 cloves of garlic
  • 1 small medium-heat chilli (deseeded if you're nervous)
  • 3 tbsp olive oil (the better the oil, the better the flavour)
  • 2 tbsp tahini
  • Juice of a lemon (two if they're tiny)
  • Pinch of salt
  • Pinch of cumin
  1. Putting everything into a blend, and whizz til smooth.
  2. Test it, and taste it. Add more flavourings if you fancy!
  3. At this stage it will probably be too thick. If so, add a splash of water and rewhizz until its a smooth, thick, but not too dry consistency.


Wednesday 25 June 2014

Homemade sun-blush tomatoes

Sadly I can't grow my own tomatoes, but instead I bought a big bag of juicy ones for just a pound at the market! Far tastier and more economical than the overpriced anaemic rubbish you get in supermarkets.

A great way to deal with a glut of tomatoes is drying them. I love sun-dried or sun-blush tomatoes, they're delicious in a rocket salad, with pasta, in sandwiches, a whole array of different uses! Sadly in the UK we don't have that blazing Mediterranean sun to dry things in the air, but instead, it's quite simple to put them in a very low oven for a few hours.

If you want oven-blush tomatoes, take them out when they're still juicy, keep in the fridge and use them in a few days. Otherwise leave them til they've shrivelled but not too dark, and pack them in jars of olive oil. The tomatoey oil is delicious for cooking, salad dressings or with bread dipped in it!

Recipe

  • Lots of tomatoes (say 300-500g)
  • Oil
  • Thyme or oregano
  • Salt
  • Few cloves of garlic
  1. Cut your tomatoes in half across the middle.
  2. In a bowl, mix them with 2 tbsp oil, herbs and salt so they are all coated.
  3. Pack them into a baking dish or tray, cut side up.
  4. Put your oven on a low heat (80-100C), and cook for about 3 hours or more until they've reached the consistency you require.
  5. Remove and cool.
  6. Slice or thickly chop a couple of cloves of garlic.
  7. Take a couple of sterilised jars and pack the tomatoes and garlic inside.
  8. Top up with good olive oil.

Variations

Add as much garlic as you like, personally I love the garlicky oil. Sliced or dried chillis also add a good kick.

A food dehyrator is obviously a good way to dry tomatoes, but if you're lucky enough to have sun hot enough to actually dry things, prepare them as above then put on racks in full sun. Cover with muslin to keep the flies off and bring in at night. They'll dry in a couple of days. Apparently leaving them in a hot car also works!

Tuesday 24 June 2014

Pan-roasted plum tomato pasta

This is absolutely one of my favourite tomato recipes for juicy ripe cherry or small plum tomatoes. It looks simple but it's a real taste of Mediterranean summer, and ready in minutes. The tomatoes roast in the pan and pop, so the sweet juice mixes with the lovely blackened skin to produces a delicious sauce.


  • Handful of plum or cherry tomatoes per person, washed and dried
  • One large or two skinny spring onions per person, roughly chopped
  • 100g of conchiglie/pasta shells per person
  • Tbsp or so of chopped fresh basil or parsley
  1. Start cooking the pasta as per instructions.
  2. Heat a frying pan or wok with a generous slosh of oil.
  3. Drop the whole tomatoes into the pan. Keep rolling them around the pan for five or so minutes, during which time they'll shrivel, the skin will split and go a little black.
  4. Add the chopped onions and stir, they don't need much cooking.
  5. Deglaze the pan with a splash of the pasta cooking water.
  6. Drain the pasta and add it to the tomatoes.
  7. Stir and serve, sprinkled with fresh basil or parsley and some parmesan!

Variations

If you have it, a splash of balsamic vinegar adds bite and sweetness. Tomatoes are also great with thyme, add fresh sprigs when the tomatoes are nearly cooked.

Friday 20 June 2014

Ruby Grapefruit Marmalade

Just showing off my Ruby Grapefruit Marmalade! I love hot buttered toast and marmalade in the morning, and the fragrant tang of grapefruit is just perfect. Using red, pink or ruby grapefruit gives it a lovely colour too.

But marmalade isn't just for toast - it's great as a glaze on duck and ham (see, I can do meat suggestions!), in a marmalade sponge cake, or as a glaze on top of a rich fruit cake. It's also tasty with a sharp cheese!

Cook it just like my plum jam recipe, equal amounts of sliced fruit and sugar but I add the juice of a lemon but to make it sharper. I love a chunky marmalade, but if you don't like "bits", whizz up the cooked fruit with a hand blender before adding the sugar.

Wednesday 18 June 2014

Halloumi & beetroot salad

A quick lunch post as this looked pretty!

This is almost veg that I needed to use up. The salad consists of one fresh beetroot and one carrot, grated; chopped spring onions, tomato and cucumber; and some fresh parsley. I tossed it together with salt and a squeeze of lemon juice, and nestled it some shredded iceburg lettuce.

I had leftover new potatoes so made a quick potato salad with yoghurt and spring onions, fried up the halloumi and popped a few olives on top. A filling and colourful summer salad.


Friday 13 June 2014

Curry Night! Quorn Tomato and Spinach Curry with Green Bean Fritters

Friday night is curry night! When the weather's hot, a spicy curry and a cold beer go down a treat. Here's my takeaway alternative: quorn palak with green been fritters and a refreshing raita.


Quorn Palak (Curry with tomato and spinach)

Clarified butter or ghee gives it that rich flavour, restaurants generally use far too much which makes them greasy and fattening! Alternatively use creamed coconut, or just fry things in oil then add a knob of butter into the sauce later as a cheat.

This serves 2, scale up for more.
  • 4 Quorn fillets (or equivalent chunks)
  • 2 tbsp curry paste (Madras or whichever you prefer)
  • 2 medium onions or 1 large
  • 4 chunks frozen spinach or equivalent fresh, wilted
  • 2 tbsp coconut butter or ghee
  • 1 tin chopped tomatoes

  1. Slice the quorn fillets into thick slices of assorted sizes.
  2. Chop the onions in half, and then into thin slices.
  3. Chop the spinach.
  4. Add ghee or oil to a pan and fry them together til the quorn slightly browns and the onions go translucent.
  5. Add the curry paste (how much really depends on how strong you like it!). Mix with the onion and quorn til everything is coated.
  6. Add the spinach, then the chopped tomatoes.
  7. Cook on a medium heat til the sauce reduces and thickens.
  8. Season with salt to taste at the end.
  9. Serve with rice or flatbreads!

Variations

This also works well with chickpeas or paneer.


Green bean fritters

2 handfuls of French beans (imprecise but it depends how big the beans are!)
5 tbsp self-raising flour
1 tsp turmeric
1 egg

Trim the beans. If using frozen, defrost them then press them dry with a tea towel.
Mix the flour, turmeric, egg and a pinch of salt into a sticky batter.
In a large bowl, mix the batter with the beans. Make sure each bean is coated with a thin sticky layer.
Form the beans into about 4 lumps, or 6 if you prefer smaller.
Heat a pan, wok or deep-fat fryer. Drop the fritters into the oil for a few minutes each side. They should puff up a little. Cook til golden.
Drain them on kitchen towel then serve hot.

Raita


Raita makes a lovely cool side dish if you're having something spicy. Mix chopped cucumber and mint with thick yoghurt and a pinch of salt. Enjoy!

Monday 9 June 2014

Halloumi and tomato basket starter

When cooking I often have random inspiration based on what I have in the fridge!  I had this idea for a starter which looks fancy but is very simple.

Bread baskets make a great base for a starter, they're pastry for cheats. Take a slice of bread, roll it flat with a rolling pin, then cut it into a neat square. Lightly butter one side, season with salt and pepper, then firmly press the buttered side down around the underside of a muffin tin or anything similarly shaped. Put in a hot oven at 200C for about 10 minutes til they're crisp.

My tomato salsa is just chopped tomatoes, the juicer the better, with chopped spring onion, chopped parsley (and/or basil if you have it), a splash of balsamic vinegar and a squeeze of lemon juice. Season with salt and pepper, toss together and leave in the fridge til you need it.

Fry the halloumi (cutting it into triangles is slightly more original than rectangles), and assemble, giving a final squeeze of lemon juice over the halloumi.

Tip: a splodge of sticky balsamic vinegar reduction in the centre of the plate stops it sliding around when you serve!

Saturday 7 June 2014

Summer teatime: Plum jam & Scones

The downside of loving food is eating too much of it! I've been on a diet lately hence not posting in a while.

Today I had a basket of juicy black plums. To be honest I'm not keen on eating plums, but I love plum jam. And what's the best use for plum jam? Scones! A perfect teatime treat for a summer's day.

I was always rather afraid of jam making, it always seemed mysterious and complicated. But once I started, I discovered how easy it is once you summon up the courage.

My tips are, get a sugar thermometer, and make sure you keep stirring so it doesn't burn on the bottom! Jam tends to bubble and splash when cooking, so I recommend using a large pan that's only a third full to minimise mess. Rubber gloves also protect your hands from sugar splashes!

Plum Jam

Jam uses roughly equal amounts of fruit and sugar. I always try to use less sugar (say 60/40), but it just makes it trickier to set.

  • 750g plums, chopped and stoned
  • 750g sugar
  • 1 small apple, peeled and chopped
  • Juice of half a lemon
  • 100 ml water
  1. Add the fruit, juice and water to a pan, bring to the boil and simmer for half an hour or so until the fruit is cooked.
  2. Take off the heat, and stir in the sugar until it dissolves.
  3. Return to the heat and crank up to maximum. I have a sugar thermometer which hangs on the side of my pan so you can always see the temperature.
  4. Stir gently every so often so that it doesn't stick to the bottom.
  5. Keep checking the temperature. When it rises to 104C, that's the "setting point" at which it turns into jam.
  6. To test whether it's set, the traditional method is to put a couple of saucers into the freezer. Drop a small dribble onto a cold plate and poke it with your finger. If it "wrinkles" or just feels jelly-like, it's set. If it stays runny, you need to cook for longer.
  7. Once it's reached setting point, take off the heat. Leave to cool for a few minutes. It will thicken as it cools so don't worry if it still seems runny, but if it's very thick while it's still hot, you might want to add a splash of water from the kettle.
  8. Pour into sterilised jam jars. I always label my jars so I remember what they are and when I made them!

Scones

Scones are one of my store-cupboard staples. If I was a glamorous housewife I could claim I only make them when unexpected guests pop by, but the truth is I make them for myself because they're so quick! I tend to leave out butter but add 50g for more indulgent scones. Serve them with butter and/or clotted cream for full-fat luxury, or just with greek yoghurt for those watching their waistline!

  • 225g self raising flour 
  • (or, 225g plain flour plus 1.5 tsp baking powder)
  • 150 milk
  • Pinch of salt
  • 1 tsp sugar
  • Handful of dried fruit (optional)
  1. Mix it all together in a bowl.
  2. Bring together into dough, you just want to mix it so everything is incorporate into a ball.
  3. Preheat your oven to 220C.
  4. Transfer to a floured surface, and roll so that it's an inch or more thick.
  5. I'm greedy and like big scones so I use a large pastry cutter to make 4 scones. A smaller one should make 6, or 8 for bite-sized ones.
  6. Punch the cutter straight down, trying not to twist the sides.
  7. Pop each one onto a baking tray. You can leave them plain or glaze with milk.
  8. Whack into the hot oven and cook for 15 mins.

Wednesday 23 April 2014

Healthy roast veg with bulgar wheat and herb dressing

Lately I've been eating too much nice food and not doing enough exercise, which inevitably piles on the pounds! In the battle of the bulge there are all kinds of faddy diets, but for me I follow a simple plan: cut out the treats, bread and cheese, and fill up on lots of fresh fruit and veg.

The important thing is to keep yourself full, eat an orange, apple or pear when you're tempted to a snack. Another underestimated tip is try to make your dinners attractive, so they're tempting and you don't feel you're depriving yourself. I thought I'd post this simple mid-week dinner since it looked pretty!


No recipe really, I just chopped up a load of whatever veg I had handy: peppers, courgettes, onions, carrots, celery. Toss in a teaspoon of oil and bake for 30 mins at 200C. I then threw in a handful of frozen green beans and a couple of Quorn fillets for another 20 minutes.

To go with it, half a cup of bulgar wheat left to steep in a cup of boiling water and a tsp of vegetable stock.

Lastly, I whizzed up a load of fresh mint and thyme from my pots with the juice of a lemon, then drizzled over everything generously.

Saturday 19 April 2014

Best Beer-Baked Beans

Britain loves baked beans! They were first sold at Fortnum & Mason's in 1886 as a luxury food, but now we eat more of them than anyone else in the world. They're often seen with a fried breakfast, but my family often had them with eggs and homemade chips on a Saturday lunchtime.


While they're handy from a can, I like to spoil myself with these luxurious beer baked beans. They really are ten times better. And if you make them yourself with my recipe, they're much less likely to give you the infamous "bean wind".

Beer-baked beans

Baked beans are traditionally made with haricot beans but you can use any kind or combination. I've been experimenting with Nigerian honey beans, but you can use pinto beans, borlotti beans, canellini or anything you have handy.

Use any beer you want, the browner the colour the richer the flavour, though lager works just fine.

I bottle and keep these beans for a few months, but it's very important to be scrupulous about sterilising and sealing. Alternatively they freeze very well in individual portions.

  • 500g white beans
  • 2 medium onions
  • 1 large stick celery
  • 1 large carrot
  • 3 tsp mustard
  • 1 tsp chilli powder
  • 2 tbsp dark brown sugar
  • 3 tbsp black treacle or molasses
  • 1 tin of chopped tomatoes
  • 4 tbsp vinegar (cider or red wine are ideal)
  • 2 cloves garlic, crushed
  • 1 tin/bottle of brown ale (approx 440ml)
  • 2 tbsp of tomato ketchup
  1. Soak the beans for 8 hours or overnight. To reduce "wind", drain them and change the water at least once during soaking, and make sure to rinse them thoroughly before cooking.
  2. Boil the beans rapidly for 10 minutes then simmer for 30 minutes until just cooked.
  3. Meanwhile, finely chop the onions, celery and carrot.
  4. Sauté gently in a pan, then add all the remaining ingredients.
  5. Bring to the boil, and add the cooked beans.
  6. Reduce to a gentle simmer and leave to cook uncovered for roughly 1.5 hours, until the sauce has reduce to a thick ooze, and the beans are very tender. Add an extra cup of water if it gets too thick before they're done.
  7. Once cooked, season with salt to taste.


Variations

Traditionalists can bake the beans in the oven at 160C for about three hours, but it's a waste unless you have the oven on for some other reason!

The chilli and mustard give them a hint of heat, add more if you like spicier beans.

Tuesday 15 April 2014

Custard Tarts

When life gives you leftover eggs and pastry, make custard tarts! After my pie-making session the other day I had some scraps of pastry and most of a beaten egg left over. Whenever you make pastry there are always trimmings, so this is a great way of using it up that I'll definitely use again.


I mixed an equal amount of plain yoghurt with the egg, plus a couple of tablespoons of sugar. I roughly rolled out the leftover pastry and used it to line two silicon muffin cases, poured in the egg mixture, and sprinkled it all with nutmeg. Since the pies were still cooking in the oven I put the tarts in at 200C for the last 15 minutes of baking. A great unexpected treat!

I actually left these in slightly too long since I was busy, take custard tarts out when they're still quite wobbly as they carry on cooking even when out of the oven. Normally you'd use cream but I had yoghurt handy, it gives them a slightly grainy, cheesecakey texture.

Even so, they were yummy, and I ate them both!

Sunday 13 April 2014

Pies pies pies!

On a Sunday I often hanker for something really English and old-fashioned, like my gran used to make. Something wholesome with cabbage and potatoes. It's not fancy, it's not trendy, but what can be more English than a pie?

This savoury pie uses a quick and easy pastry that takes me right back to my childhood: suet crust. It's quick enough to have it ready on the table in under an hour. There's no messy rubbing in, just mix it up, roll out and go. Today I'll show you two great pie fillings: Quorn Chicken and Mushroom Pie and a Fake Duck and Ale Pie.

For my meat-eating readers, these recipes work great with meat too!


Suet Crust Pastry

This makes just the right quantity for my 8-inch pie tin.

  • 200g self raising flour
  • ½ tsp salt
  • 100g vegetable suet
  • or: 50g vegetable suet, 50g frozen butter, grated
  • 5-6 tbsps very cold water
  1. Put the flour and salt in a large bowl. Tip the suet into the flour and stir. If using butter, freeze your block of butter and grate it straight into the dry flour.
  2. Spoon 5 tbsps cold water into the mixture and mix with a fork until it forms into a uniform lump. Add another tbsp if it's still dry.
  3. Remove from the ball and gently form it into a smooth ball, making sure all the flour is incorporated.
  4. You can use it straight away, or wrap and leave for ten minutes in the fridge while you work on the pie filling.

Quorn Chicken and Mushroom Pie Filling

For chicken-type recipes I often use my fingers to shred up a Quorn roast, it's more chunky and substantial than fillets or pieces, and also slightly cheaper by weight. The tarragon and yoghurt make this tasty and tangy so it's good eaten cold as well as hot.


  • 200 g Quorn (roughly shredded Quorn Roast, chopped fillets)
  • 250 g mushrooms, thickly sliced
  • 1 onion, finely chopped
  • 1 large celery stick, finely chopped
  • 1 tbsp vegetable oil
  • 2 tsp dried tarragon (or a few chopped fresh leaves)
  • 1 clove garlic, crushed
  • Slosh of white vermouth or white wine (roughly a small glass)
  • 1 tsp Swiss Marigold stock powder
  • 4 heaped tbsp thick set yoghurt
  1. Heat the oil in a pan on a medium heat. Gently fry the onion and celery til the onion loses its pungency
  2. Add the mushrooms and stir until they're slightly browned and start releasing their juices.
  3. Add the crushed garlic and stir for a minute.
  4. Sprinkle in the stock powder and tarragon, then pour in the wine. 
  5. Stir thoroughly to deglaze the pan and let it reduce for a few minutes.
  6. Take off the heat and leave to a little, then stir in the yoghurt.
  7. Season with salt and pepper.
  8. Taste the mixture - if your yoghurt is particularly sour it might need a sprinkling of sugar just to balance the flavour.

Variation

Tarragon adds an original note to this pie, it's a classic combination with chicken type recipes. If you're not keen on tarragon, thyme is also great; lemon thyme is even better if you can get it.

For more luxury use double cream instead of yoghurt! For a more saucey pie make a small amount of white sauce. This is great but just takes more time, I'm all for quick and simple recipes but sometimes it's worth it.


Fake Duck and Ale Pie

There are all kinds of beefy meat alternatives available but since I discovered mock duck in a can in my local Asian supermarket, I absolutely love it. It's made with seitan, a surprisingly savoury and meaty form of wheat gluten.

  • 1 can of mock duck (approx 250g shredded seitan)
  • 200g button mushrooms, sliced
  • 1 onion
  • 1 large carrot
  • 1 large stick celery
  • 1 bay leaf
  • 1 heaped tsp Marmite (optional)
  • ½ pint dark brown ale
  • 1 tsp plain flour
  1. If using canned seitan, drain off the liquid and dry the seitan on a tea towel. If it's in large pieces, shred it with your fingers into bite-sized chunks.
  2. Dice the onion, carrot and celery.
  3. Heat 1 tbsp of oil in a pan on a moderate to high heat and fry the seitan until it starts to brown.
  4. Add the vegetables and cook off the onions til slightly translucent.
  5. Add the mushrooms and cook for a few minutes.
  6. Sprinkle in the flour and stir til everything is coat, then add the brown ale and spoonful of Marmite.
  7. Mix thoroughly and reduce on a gentle heat until the sauce becomes thick and savoury.
  8. Season with salt and pepper. If the beer and Marmite leave it tasting a little bit sharp, soften with half a tsp of sugar.

Variations

Use whatever kind of ale you like, but the darker and richer the ale, the tastier the pie will be. I didn't use herbs this time but thyme is a good addition.


Filling and baking your pie

I generally use an 8" loose-bottomed sandwich tin for my pies.

  1. Preheat your oven to 200C and leave your pie filling to cool.
  2. Retrieve your pastry from the fridge and cut off roughly a third of it to save for the top.
  3. Sprinkle flour on your surface and roll out the pastry into a circle wide enough to cover the bottom and sides of your tin, plus a little bit more.
  4. When rolled out, sprinkle with flour. Gently fold the pastry in half, then fold it in half again into a pie-wedge shape.
  5. Centre the point of your pie wedge in the middle of your tin, unfold it, then unfold it again. I find this the best way of getting pastry into a tin.
  6. Gently press the pastry into the corners of the tin. Using a spare lump of pastry helps with this.
  7. Roll out the remainder of the pastry for the top, roughly an 8-9" circle.
  8. Spoon your cooled filling into the pie and press down so it has an even surface.
  9. Roll up the pastry top onto your rolling pin, then unroll it onto the top of the pie.
  10. Press the pastry lid down onto the pie. I usually crimp it by pressing my thumb into the pastry but use whatever style you prefer, my gran used a fork!
  11. With a sharp knife, trim off the excess pastry. I do this at a 45 degree angle but the pastry doesn't shrink much so this is mainly cosmetic.
  12. For a shiny finish glaze the top with beaten egg. Pastry trimmings make a nice decoration too.
  13. Cut a hole or cross in the middle to allow steam to escape.
  14. Pop into the middle of your hot oven and bake at 200C for 30 minutes, until well browned.

Eat and enjoy!